Shaders are programs that transform some input to some output
They run for each specific section of the graphics pipeline
They are isolated
GLSL
Shaders always begin with the version declaration
Followed by a list of I/O variables, uniforms and a main function (entry point)
#version version_numberin type in_variable_name;in type in_variable_name;out type out_variable_name;uniform type uniform_name;void main(){ // Process input(s) and do some graphics stuff ... // Output processed stuff to output variable out_variable_name = weird_stuff_we_processed;}
Specifically for the vertex shader, each input var is called a vertex attribute, which has a max amount allowed limited by the hardware (usually 16).
Types
Normal C like types - int, float, double, uint, bool
Wherever an output variable matches with an input variable of the next shader stage data is passed along. (should have same type and name)
Vertex shader
Receives input directly from vertex data
To define how the vertex data is organized we specify the input variables with location metadata so we can configure the vertex attributes on the CPU
Fragment shader
Requires a vec4 color output variable, since the fragment shaders needs to generate a final output color
Uniform
Uniforms are another way to pass data from our application on the CPU to the shaders on the GPU
However, uniforms are global - unique per shader program object and can be accessed from any shader at any stage in the shader program.
Whatever value is set, it is retained until reset or updation.
We first need to find the index/location of the uniform attribute in our shader using glGetUniformLocation and then update it using glUniform...
Adding more attributes
If we want to customize each vertex, we can add more uniforms but a better way is to supply more vertex attributes.
For example, to add color to each vertex, add a new color attribute to the vertex shader (with a new location metadata).
The new color data can be bundled with the vertex array.
Because we added another vertex attribute and updated the VBO's memory we have to re-configure the vertex attribute pointers (change the stride and offset accordingly).
Textures
Intro
A texture is a 2D image (can be 1D, 3D) used to add detail to an object.
We can give the illusion the object is extremely detailed without having to specify extra vertices
To map the texture to the polygon, we need to specify which vertex corresponds to which part of the texture which is basically the texture coordinate.
Texture coordinates range from (0, 0) at the bottom left to (1, 1) at the top right.
Retrieving colors from texture is called sampling
We only have to pass texture coordinates to the vertex shader, which then passes those to the fragment shader that neatly interpolates all the texture coordinates for each fragment
Texture sampling has a loose interpretation and can be done in many different ways and is thus our job to tell OpenGL how it should sample its textures.
Texture Wrapping
If we define texture coordinates outside 0-1 range, OpenGL provides options to show these
GL_REPEAT - default, repeats the image
GL_MIRRORED_REPEAT - same but mirrors image on repeat
GL_CLAMP_TO_EDGE - clamps coords b/w 0 and 1
GL_CLAMP_TO_BORDER - coords outside range have specified color
Each of these are set using glTexParameter*
Texture filtering
Texture coordinates do not depend on resolution but can be any floating point value.
OpenGL has to figure out which texture pixel ( texel ) to map the texture coordinate to
Options include
GL_NEAREST - nearest neighbour or point filtering
Default
OpenGL selects the texel that center is closest to the texture coordinate.
Forms a blocked pattern when applied to low res textures
GL_LINEAR - bilinear filtering
Takes an interpolated value from the texture coordinate's neighboring texels, approximating a color between the texels
The smaller the distance from the texture coordinate to a texel's center, the more that texel's color contributes to the sampled color
Forms a smooth but blurry pattern when applied to low res textures
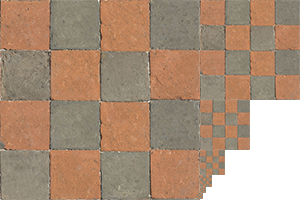
Mipmaps
For far away objects, it should produce lesser fragments
OpenGL has difficulties retrieving color value from the texture since it has to pick a color that spans a large part of the texture producing visible artifacts and high memory usage.
To solve this, we use mipmaps - a collection of texture images, each subsequent image being twice as small
The lower resolution images are used for far away objects
We create this using glGenerateMipmap
Filtering options -
GL_NEAREST_MIPMAP_NEAREST: takes the nearest mipmap to match the pixel size and uses nearest neighbor interpolation for texture sampling.
GL_LINEAR_MIPMAP_NEAREST: takes the nearest mipmap level and samples that level using linear interpolation.
GL_NEAREST_MIPMAP_LINEAR: linearly interpolates between the two mipmaps that most closely match the size of a pixel and samples the interpolated level via nearest neighbor interpolation.
GL_LINEAR_MIPMAP_LINEAR: linearly interpolates between the two closest mipmaps and samples the interpolated level via linear interpolation.
Loading and creating textures
We can create our own image loader to bytes solution but it is hard to implement all file formats
We thus use - stb_image library
The vertex shader has a new attribute for texture coordinates.
The fragment shader needs access to the texture object and this is done by passing data to uniform of the datatype - sampler (a type for texture objects)
We use the built-in texture function in GLSL to sample the color.
Texture Units
We don't actually assign the sampler2D value with glUniform .
Using glUniformli we can assign a location value to texture sampler to set multiple textures at once in a fragment shader.
The location of a texture = texture unit
Default texture unit is 0 and hence a location was not needed to be assigned. New units can be activated with glActiveTexture
The purpose of texture units is to allow us to use multiple textures in shaders
We then need to modify the fragment shader to accept another sampler
The images rendered are flipped upside down because OpenGL expects 0.0 y coord to be the bottom of the image but its usually the opposite. Flip it using the image library